Movement
The "Movement" block is the main block of the project warehouse. Here the project entries are laid out by warehouse status, and here they are picked, shipped and received back. How to open the project warehouse is described in "Warehouse".
The button panel
Above the list of entries there is a row of round buttons:
"▶" starts shipping. Until you click it, the warehouse is view-only: you cannot select entries or move them between statuses. After you click it, the button turns dark, checkboxes appear next to the entries and the other buttons become active. Click it again to finish.
Camera: scanning barcodes with the camera of a phone or tablet.
RFID: working with an RFID reader. The button is active if an RFID reader or gate antennas are connected.
Keyboard: entering a SKU number by hand.
How to ship and receive equipment with these buttons is described in "Scanning barcodes and changing position statuses".
On the right of the panel are the search, the gear "Setup" and the view switch: list or table. The table is available on screens wider than a phone.

Two views: list and table
List: each column is a warehouse status, and the entries inside a column are shown as a tree: estimate sheet → kit → entry → SKUs. More: "Kanban mode".
Table: the statuses go one under another, and each has a table with columns you choose, photos and filters. More: "Table view".
The selected view is remembered for you and this project. On a phone the warehouse always opens as a list.
Search
Start typing in the "SKU search" field: the list is narrowed at once to matching entries in all warehouse statuses. The search looks at the entry name, the SKU number and the lessor name for sublease. To bring back the whole list, clear the field with the cross.
On a narrow screen there is a magnifier button instead of the field: it opens the "SKU search" window with a "Search" button.
Display settings
Click the gear to open the "Setup" window. In the "Warehouse Display Settings" section:
"Nesting": on, entries are shown as a tree with grouping; off, as one flat list;
"Sheets": group entries by estimate sheets;
"Kits": on, a kit is shown as one row with its name and its contents inside; off, everything that belongs to kits is shown as separate entries.
In the "Table display settings" section you choose the columns for the "Table" view, see "Table view". Click "Save".
The warehouse display settings are saved for you in this project and do not affect other employees. The settings new projects open with are set in the gear "Settings" → "System" → "Specification and warehouse", block "Warehouse. Default display settings". More: "Warehouse. Default Display Setting".
Entry and SKU information
You can see detailed catalog data without leaving the warehouse. Entries and SKUs have an "i" icon next to them.
The icon next to an entry (next to the green number of units) opens the "Information" window: photos, "Name", "Manufacturer", "Model", "Type", "Qty", "Internal comment" and "Parameters": width, height, depth, power, weight, current. A set has a tab with the contents of the set.
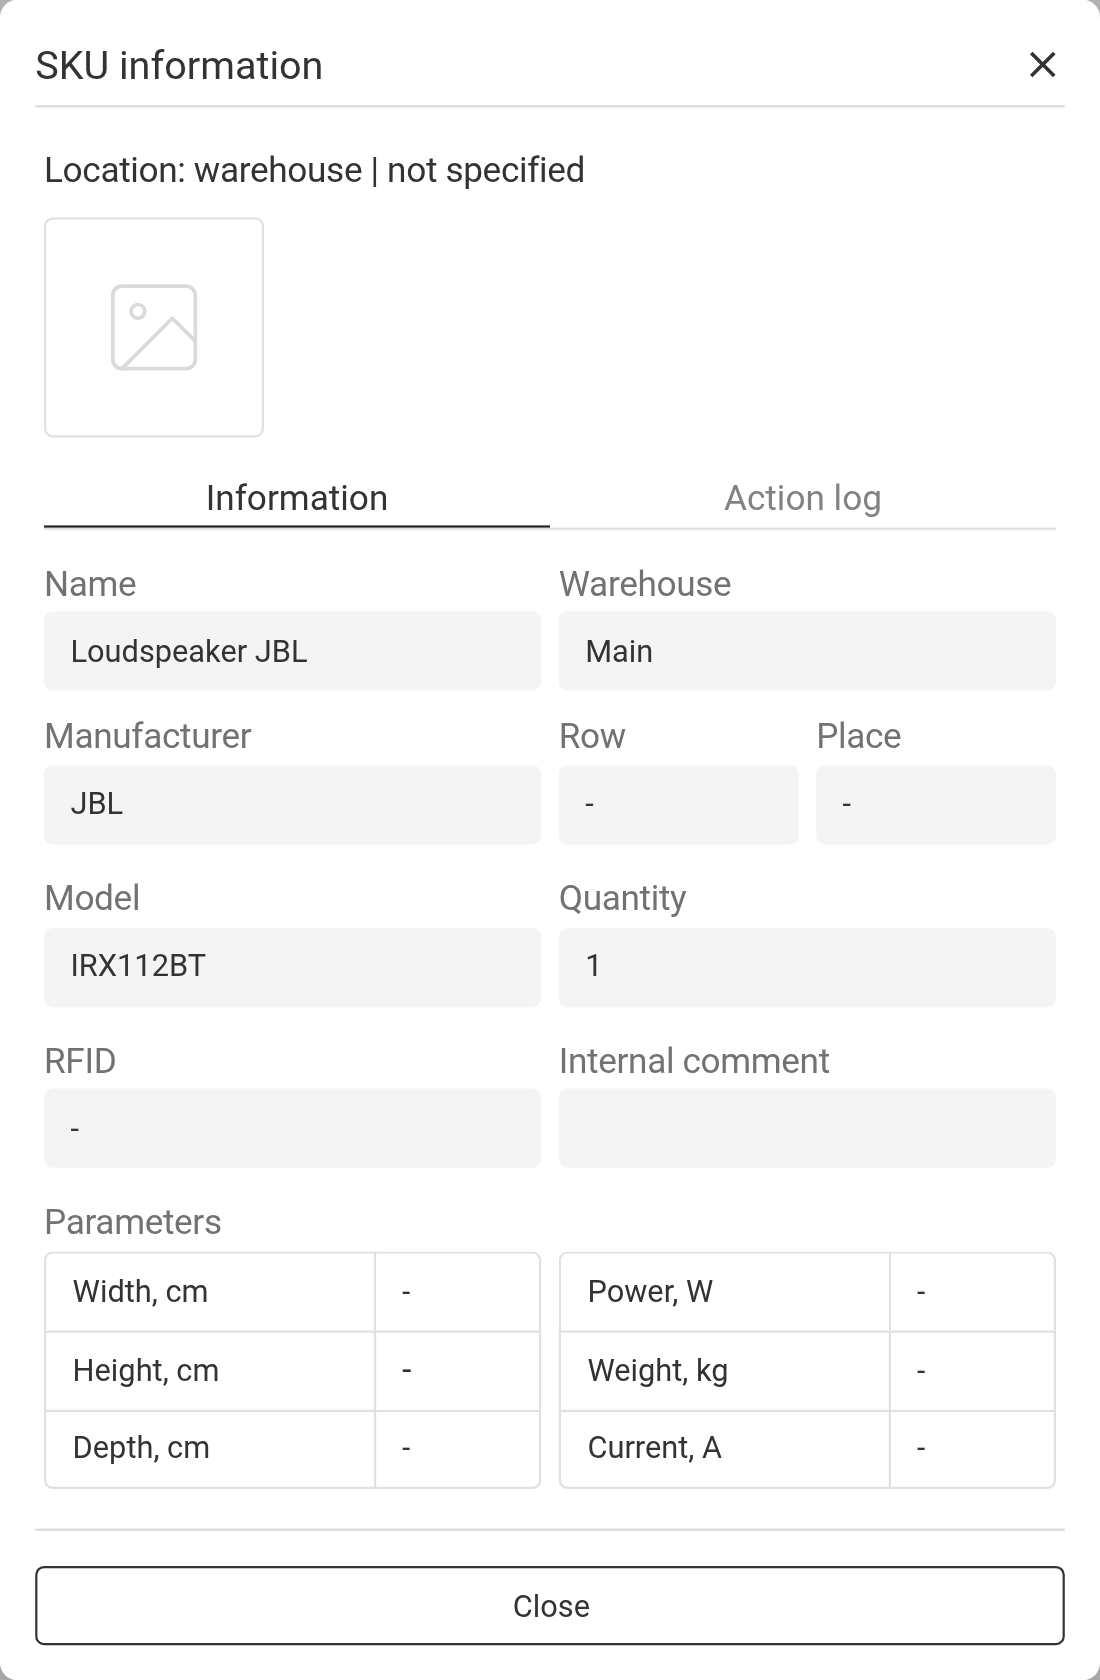
The icon next to a SKU opens the "SKU information" window. At the top is the location of the SKU. The "Information" tab shows the photo, name, warehouse, row and bin, manufacturer, model, quantity, RFID tag, internal comment and parameters. The "Action log" tab shows the history of the SKU across all projects: date, employee, action and a link to the project. If the SKU is a set, there is a "Composition" tab.
Click a photo to open it at full size.
Empty rows in the warehouse
Entries added to the specification as an empty row (not from the catalog) also go to the warehouse. You can ship them and move them between statuses like ordinary equipment. The "i" icon of such an entry opens the "Information" window with the data you entered for it in the "Shortage" block: name, manufacturer, model, type and parameters.
If in the "Shortage" block you chose sublease, production or purchase for the entry, the row shows "sublease", "production" or "purchase" instead of a SKU number. For sublease, the lessor and the delivery method are shown next to it, and the "i" icon opens the sublease data. More about shortage: "Shortage".
Moving part of the quantity
Accessories and consumables can be moved in parts, not only as a whole. Select them and click the arrow in the status header: the "Movement of accessories and consumables" window opens. Enter the "Quantity" for each row and click "Confirm". The rest stays in the previous status.
When you scan accessories and consumables, the system also asks for the quantity: in the "Movement" window, in the "Confirm the quantity" field. If "Scan one by one" is turned on in the entry card in the catalog, the window does not appear: each scan moves one unit. More: "Scanning barcodes and changing position statuses".
Other actions
To mark SKUs as lost, faulty or needing diagnostics, use the "Actions for selected SKUs" icon in the status header. More: "Kanban mode".
Equipment can be moved from the venue straight to another project: select it, click "Actions for selected SKUs" in a status with the location "Venue" and choose "Move to another project".
To return, move or mark as lost the consumables at the venue, see "Consumables at the venue".