Entries and SKUs in the specification
In the "Specification" block, to the right of the catalog tree, there is the table with the project contents. Here the technical director or the storekeeper decides which devices go to the event: adds entries, changes quantities and assigns SKUs. Below is how the table works and what you can do in it.
Sheets and the "Summary" tab
Above the table there are the sheet tabs. Specification sheets repeat the estimate sheets: each estimate sheet has a paired specification sheet. How the sheet pairs work and what you can do with a sheet: Actions with a specification sheet.
The last tab is "Summary". It collects the entries of all project sheets at once. On "Summary" it is convenient to check the whole contents and assign SKUs without switching between sheets. Quantities cannot be changed on "Summary": next to the number there is an icon with the hint "You can change quantities on the corresponding sheets".
There is no separate "SKUs" tab any more. SKUs are assigned right in the table, in the expandable list of an entry.
How the table works
The table is built like the catalog. The "composition" level, which used to group SKUs, is gone: entries go directly inside sections.
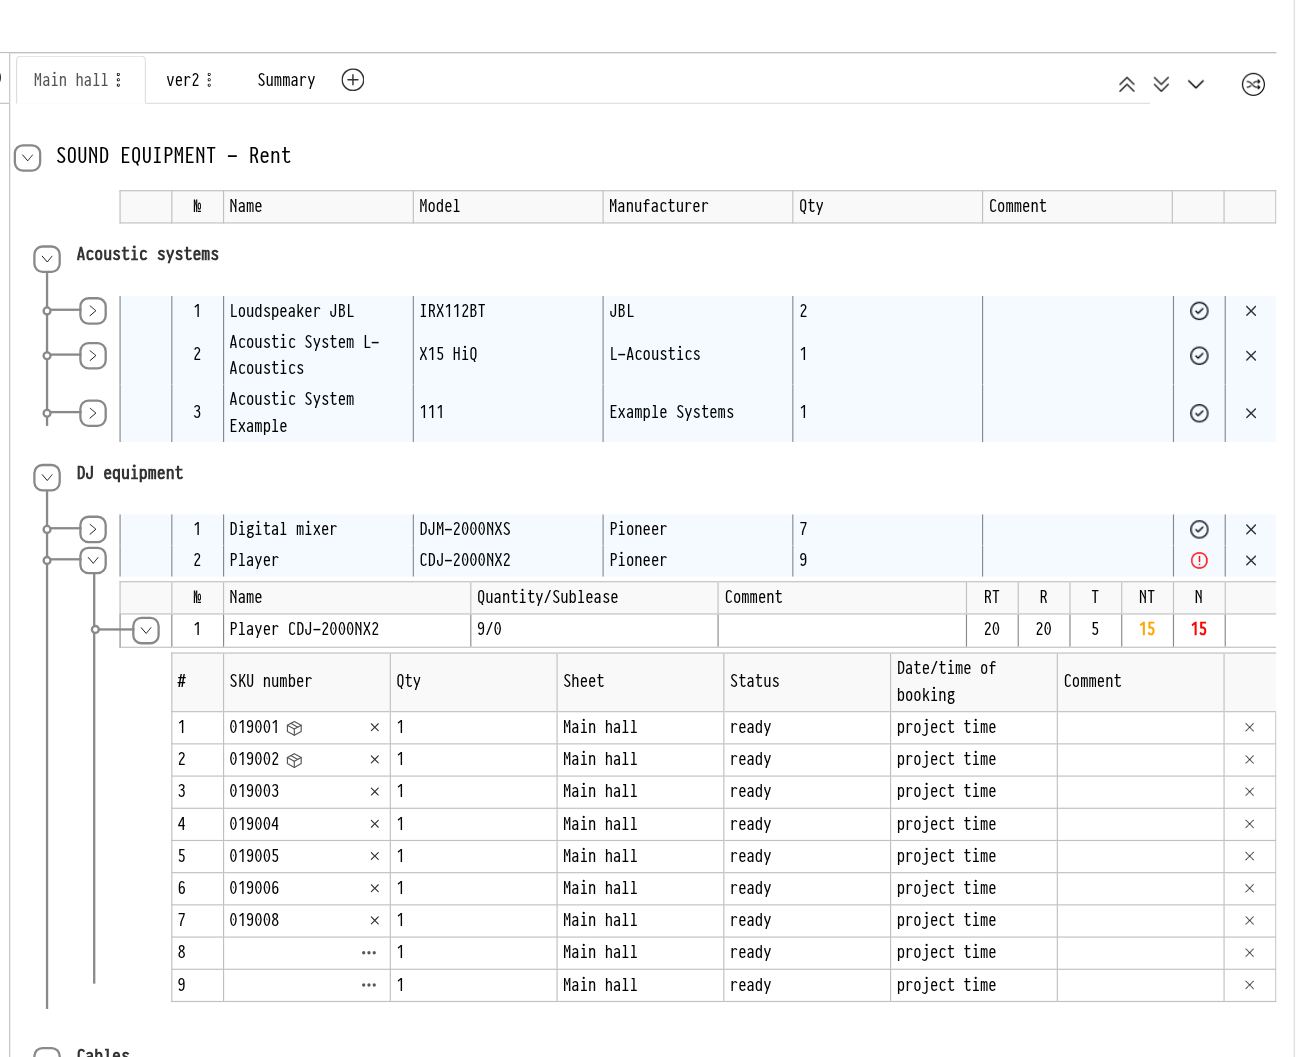
Catalog section and subsection. Header rows that collapse with the arrow on the left.
Entry. A row with the columns "№", "Name", "Model", "Manufacturer", "Qty" and "Comment". The icon at the end of the row shows whether there is enough equipment: a green check mark means everything is fine, a red exclamation mark means the entry is not fully covered. The cross deletes the entry.
Entry components. Expand the entry with the arrow on the left. For a kit you see all its components here, for a regular entry the entry itself. The "Quantity/Sublease" column shows how many units are needed and how many of them are subleased. The RT, R, T, NT and N columns show bookings and shortage. Hover over a column title to see a hint; a click on a number opens detailed booking information.
SKUs. Expand the component once more to see the list of specific units: SKU, "Qty", "Sheet", status, "Date/time of booking" and "Comment".
The icons above the table on the right collapse and expand all levels at once, or expand the table down to sections.
Adding entries
Entries are added from the catalog tree on the left. Find the entry with the search or in the tree, enter the quantity in the field next to it and click the "+" icon. A kit has two icons: "split by entries" and "in one line".
If the project has several sheets and you are working on the "Summary" tab, the system asks which sheet to add the entry to: the "Selecting a tab when adding" window. On a sheet tab, the entry goes straight to this sheet.
Adding right into an entry
Accessories and other entries can be added not as a separate row but inside an existing entry. For example, add a spare set of batteries or a cable to a wireless microphone.
Expand the entry you need in the table. All other entries need to be collapsed.
In the catalog tree on the left, click "+" next to the entry you want to add.
The added entry appears among the components of the expanded entry.
Please note. If more than one entry is expanded, the system does not know where to add and shows the message "Adding is possible if only one set of contents is expanded or if all sets of contents are collapsed to add a new entry." Collapse the extra entries and try again.
If the equipment you need is not in the catalog, add it as an empty line: the "+" icon to the right of the search above the tree. See Specification.
Changing the quantity and comment
To change the quantity, click the number in the "Qty" column right in the table. The number turns into an input field. Enter the new value and press Enter or click anywhere else. The quantity of entry components and the comment are changed the same way.
If you set the quantity of an entry to 0, the system offers to delete the entry.
A negative quantity cannot be entered.
For accessories and consumables, the quantity in the SKU row is in bold. Click it to split the row into several parts, for example if some of the cables go with a different status or at a different time. The hint next to it says: "Click on the number to create several lines and be able to apply different actions to them".
Assigning SKUs
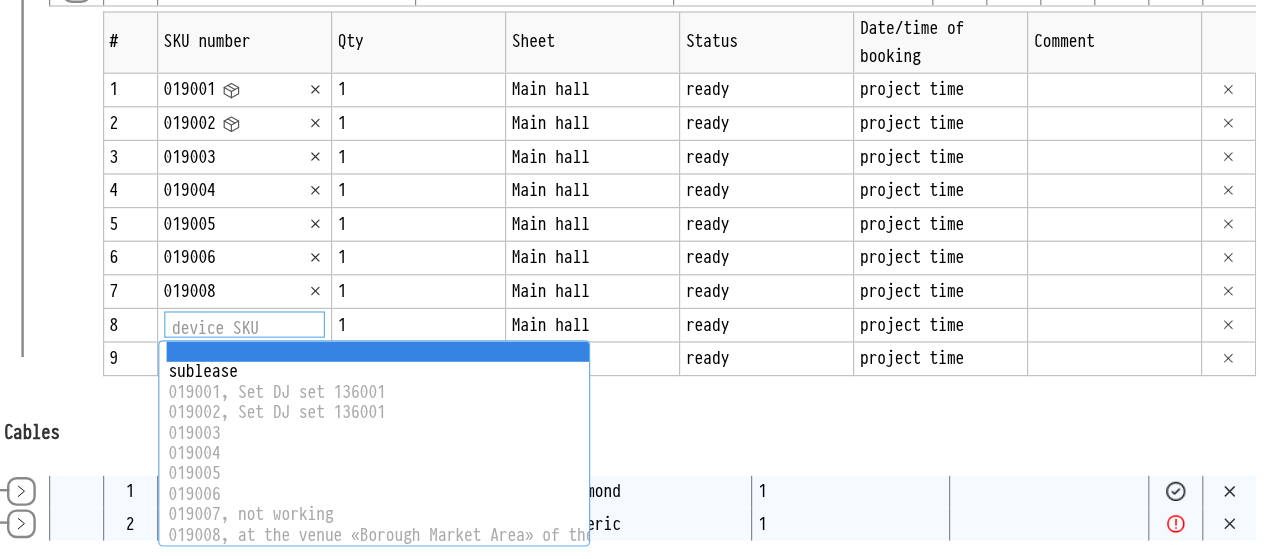
Expand the entry and its component down to the SKU list. In a row where no SKU has been assigned yet, click the "…" icon on the right. The list of free SKUs opens: choose the one you need. You can assign SKUs both on a sheet and on the "Summary" tab.
To remove an assigned SKU, click the "delete" cross next to its number. The SKU number is a link: a click opens its card in the catalog in a new tab.
If specific SKUs do not matter, they can be assigned automatically. Click the "assign random SKUs" icon above the table on the right and confirm with "Assign". The system assigns SKUs to all rows that do not have them yet.
Please note. Random assignment cannot be undone. SKUs are assigned only in warehouse statuses with the location "Warehouse". You cannot assign an SKU to equipment that is already at the venue.
Booking time
In the "Date/time of booking" column, an SKU shows "project time" or its own period. Click it to set a separate booking time for this unit. The time for the whole sheet is set in the sheet menu, the "Booking time" item.
Please note. An employee with "read-only" access to the specification sees the table but cannot change quantities, comments or SKUs.